Spring Boot JPA 게시판 댓글 작성 및 조회 구현하기
by coco3o게시판에서 댓글은 없어선 안될 중요한 부분이라고 생각한다. 그래서 오늘은 게시판의 댓글 기능을 구현해보려 한다.
1. Entity
1-1. Comment
@Builder
@AllArgsConstructor
@NoArgsConstructor
@Getter
@Table(name = "comments")
@Entity
public class Comment {

    @Id
    @GeneratedValue(strategy = GenerationType.IDENTITY)
    private Long id;

    @Column(columnDefinition = "TEXT", nullable = false)
    private String comment; // 댓글 내용

    @Column(name = "created_date")
    @CreatedDate
    private String createdDate;

    @Column(name = "modified_date")
    @LastModifiedDate
    private String modifiedDate;

    @ManyToOne
    @JoinColumn(name = "posts_id")
    private Posts posts;

    @ManyToOne
    @JoinColumn(name = "user_id")
    private User user; // 작성자
}
TimeEntity를 상속받지 않고 따로 생성 및 수정시간 필드를 추가한 이유는 아래에서 설명하겠다.
댓글의 입장에선 게시글과 사용자는 다대일 관계이므로 @ManyToOne이 된다.
한 개의 게시글에는 여러 개의 댓글이 있을 수 있고, 한 명의 사용자는 여러 개의 댓글을 작성할 수 있다.
1-2. Posts
@NoArgsConstructor
@AllArgsConstructor
@Builder
@Getter
@Entity
public class Posts extends TimeEntity {

    @Id
    @GeneratedValue(strategy = GenerationType.IDENTITY)
    private Long id;

    @Column(length = 500, nullable = false)
    private String title;

    @Column(columnDefinition = "TEXT", nullable = false)
    private String content;

    private String writer;

    @Column(columnDefinition = "integer default 0")
    private int view;

    @ManyToOne(fetch = FetchType.LAZY)
    @JoinColumn(name = "user_id")
    private User user;

    @OneToMany(mappedBy = "posts", fetch = FetchType.EAGER, cascade = CascadeType.REMOVE)
    @OrderBy("id asc") // 댓글 정렬
    private List<Comment> comments;

    /* 게시글 수정 메소드 */
    public void update(String title, String content) {
        this.title = title;
        this.content = content;
    }
}
@ManyToOne 과 @OneToMany 로 양방향 관계를 맺어주고,
게시글 UI에서 댓글을 바로 보여주기 위해 FetchType을 EAGER로 설정해줬다.
(댓글 - 펼쳐보기 같은 UI라면 Lazy로)
그리고 게시글이 삭제되면 댓글 또한 삭제되어야 하기 때문에 CascadeType.REMOVE 속성을 사용했고,
@OrderBy 어노테이션을 이용하여 간단히 정렬 처리를 했다.
2. Repository
public interface CommentRepository extends JpaRepository<Comment, Long> {}3. DTO
CommentRequestDto
@Data
@AllArgsConstructor
@NoArgsConstructor
@Builder
public class CommentRequestDto {
    private Long id;
    private String comment;
    private String createdDate = LocalDateTime.now().format(DateTimeFormatter.ofPattern("yyyy.MM.dd HH:mm"));
    private String modifiedDate = LocalDateTime.now().format(DateTimeFormatter.ofPattern("yyyy.MM.dd HH:mm"));
    private User user;
    private Posts posts;

    /* Dto -> Entity */
    public Comment toEntity() {
        Comment comments = Comment.builder()
                .id(id)
                .comment(comment)
                .createdDate(createdDate)
                .modifiedDate(modifiedDate)
                .user(user)
                .posts(posts)
                .build();

        return comments;
    }
}
댓글 작성 시간은 날짜만이 아닌 시 , 분까지 포함해주고 싶어 따로 포맷해줬다.
날짜를 문자열로 포맷 시 당연히 필드의 타입은 String이다.
CommentResponseDto
@Getter
public class CommentResponseDto {

    private Long id;
    private String comment;
    private String createdDate = LocalDateTime.now().format(DateTimeFormatter.ofPattern("yyyy.MM.dd HH:mm"));
    private String modifiedDate = LocalDateTime.now().format(DateTimeFormatter.ofPattern("yyyy.MM.dd HH:mm"));
    private String nickname;
    private Long postsId;

    /* Entity -> Dto*/
    public CommentResponseDto(Comment comment) {
        this.id = comment.getId();
        this.comment = comment.getComment();
        this.createdDate = comment.getCreatedDate();
        this.modifiedDate = comment.getModifiedDate();
        this.nickname = comment.getUser().getNickname();
        this.postsId = comment.getPosts().getId();
    }
}
PostsResponseDto
/**
 * 게시글 정보를 리턴할 응답(Response) 클래스
 * Entity 클래스를 생성자 파라미터로 받아 데이터를 Dto로 변환하여 응답
 * 별도의 전달 객체를 활용해 연관관계를 맺은 엔티티간의 무한참조를 방지
 */

@Getter
public class PostsResponseDto {

    private Long id;
    private String title;
    private String writer;
    private String content;
    private String createdDate, modifiedDate;
    private int view;
    private Long userId;
    private List<CommentResponseDto> comments;

    /* Entity -> Dto*/
    public PostsResponseDto(Posts posts) {
        this.id = posts.getId();
        this.title = posts.getTitle();
        this.writer = posts.getWriter();
        this.content = posts.getContent();
        this.createdDate = posts.getCreatedDate();
        this.modifiedDate = posts.getModifiedDate();
        this.view = posts.getView();
        this.userId = posts.getUser().getId();
        this.comments = posts.getComments().stream().map(CommentResponseDto::new).collect(Collectors.toList());
    }
}
comments 필드의 List 타입을 DTO 클래스로해서 엔티티간 무한 참조를 방지해줬다.
4. Controller
PostsIndexController
/**
 * 화면 연결 Controller
 */
@Controller
@RequiredArgsConstructor
public class PostsIndexController {

    private final PostsService postsService;

    ....

    /* 글 상세보기 */
    @GetMapping("/posts/read/{id}")
    public String read(@PathVariable Long id, @LoginUser UserSessionDto user, Model model) {
        PostsResponseDto dto = postsService.findById(id);
        List<CommentResponseDto> comments = dto.getComments();

        /* 댓글 관련 */
        if (comments != null && !comments.isEmpty()) {
            model.addAttribute("comments", comments);
        }

        /* 사용자 관련 */
        if (user != null) {
            model.addAttribute("user", user.getNickname());

            /*게시글 작성자 본인인지 확인*/
            if (dto.getUserId().equals(user.getId())) {
                model.addAttribute("writer", true);
            }
        }
        postsService.updateView(id); // views ++
        model.addAttribute("posts", dto);
        return "posts/posts-read";
    }

    ....
}
댓글 정보를 가져오는 comments를 model에 담아줬다.
CommentApiController
@RequiredArgsConstructor
@RequestMapping("/api")
@RestController
public class CommentApiController {

    private final CommentService commentService;

    /* CREATE */
    @PostMapping("/posts/{id}/comments")
    public ResponseEntity commentSave(@PathVariable Long id, @RequestBody CommentRequestDto dto,
                                      @LoginUser UserSessionDto userSessionDto) {
        return ResponseEntity.ok(commentService.commentSave(userSessionDto.getNickname(), id, dto));
    }
}
5. Service
CommentService
@RequiredArgsConstructor
@Service
public class CommentService {

    private final CommentRepository commentRepository;
    private final UserRepository userRepository;
    private final PostsRepository postsRepository;

    /* CREATE */
    @Transactional
    public Long commentSave(String nickname, Long id, CommentRequestDto dto) {
        User user = userRepository.findByNickname(nickname);
        Posts posts = postsRepository.findById(id).orElseThrow(() ->
                new IllegalArgumentException("댓글 쓰기 실패: 해당 게시글이 존재하지 않습니다." + id));

        dto.setUser(user);
        dto.setPosts(posts);

        Comment comment = dto.toEntity();
        commentRepository.save(comment);

        return dto.getId();
    }
}
User와 Posts의 정보를 받아 Comment에 저장할 수 있게 set 해줬다.
6. Mustache
posts-read.mustache
{{>layout/header}}
<br/>
<div id="posts_list">
    <div class="col-md-12">
        <form class="card">
            <div class="card-header d-flex justify-content-between">
                <label for="id">번호 : {{posts.id}}</label>
                <input type="hidden" id="id" value="{{posts.id}}"> {{! label 연결 }}
                <label for="createdDate">{{posts.createdDate}}</label>
            </div>
            <div class="card-header d-flex justify-content-between">
                <label for="writer">작성자 : {{posts.writer}}</label>
                <label for="view"><i class=" bi bi-eye-fill"> {{posts.view}}</i></label>
            </div>
            <div class="card-body">
                <label for="title">제목</label>
                <input type="text" class="form-control" id="title" value="{{posts.title}}" readonly>
                <br/>
                <label for="content">내용</label>
                <textarea rows="5" class="form-control" id="content" readonly>{{posts.content}}</textarea>
            </div>
        </form>


        {{! Buttons }}
        {{#user}}
            <a href="/" role="button" class="btn btn-info bi bi-arrow-return-left"> 목록</a>
            {{#writer}}
            <a href="/posts/update/{{id}}" role="button" class="btn btn-primary bi bi-pencil-square"> 수정</a>
            <button type="button" onclick="" id="btn-delete" class="btn btn-danger bi bi-trash"> 삭제</button>
            {{/writer}}
        {{/user}}
        {{^user}}
            <a href="/" role="button" class="btn btn-info bi bi-arrow-return-left"> 목록</a>
        {{/user}}

        {{! Comments }}
        {{>comment/list}}
        {{>comment/form}}
    </div>
</div>
{{>layout/footer}}
comment/list.mustache
{{! Comments }}
<div class="card">
<div class="card-header bi bi-chat-dots"> {{#comments.size}}{{comments.size}}{{/comments.size}} Comments</div>
{{! 댓글내용 부분 }}
<ul class="list-group-flush">
{{#comments}}
<li class="list-group-item">
<span>
<span style="font-size: small">{{nickname}}</span>
<span style="font-size: xx-small">{{createdDate}}</span>
<button class="badge bi bi-pencil-square"> 수정</button>
<button class="badge bi bi-trash"> 삭제</button>
</span>
<div>{{comment}}</div>
</li>
{{/comments}}
</ul>
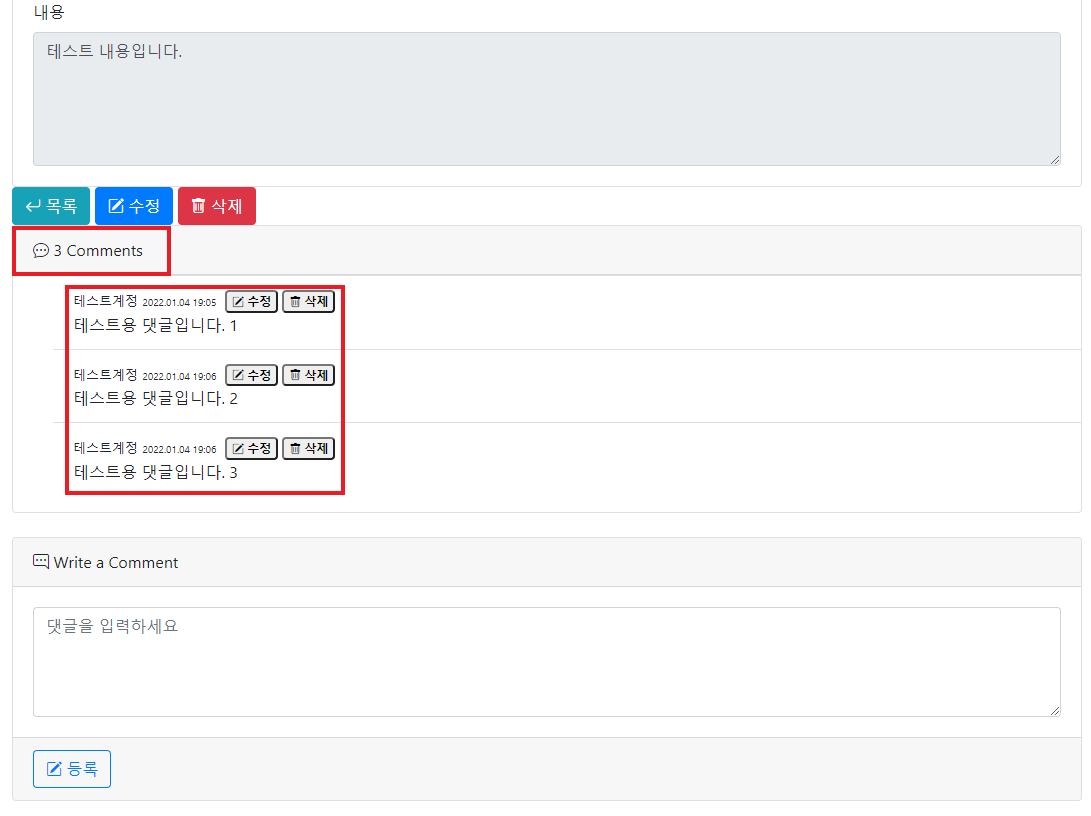
</div>{{#comments.size}} {{comments.size}} {{/comments.size}}로 댓글이 있으면 댓글의 수를 보여주도록 했고,
댓글 리스트를 보여주는 li 태그를 {{#comments}}{{/comments}}로 감싸주어 댓글이 없으면 리스트가 보이지 않도록 했다.
comment/form.mustache
<br/>
<div class="card">
    <div class="card-header bi bi-chat-right-dots"> Write a Comment</div>
    {{! 댓글작성 부분}}
    <form>
        <input type="hidden" id="postsId" value="{{posts.id}}">
        {{#user}}
            <div class="card-body">
                <textarea id="comment" class="form-control" rows="4" placeholder="댓글을 입력하세요"></textarea>
            </div>
            <div class="card-footer">
                <button type="button" id="btn-comment-save"class="btn btn-outline-primary bi bi-pencil-square"> 등록</button>
            </div>
        {{/user}}
        {{^user}}
            <div class="card-body" style="font-size: small"><a href="/auth/login">로그인</a>을 하시면 댓글을 등록할 수 있습니다.</div>
        {{/user}}
    </form>
</div>
인증된 사용자(로그인 상태)만 댓글을 달 수 있다.
7. app.js
const main = {
    init : function() {
        const _this = this;

        ...

        // 댓글 저장
        $('#btn-comment-save').on('click', function () {
            _this.commentSave();
        });

    },

    ...

     /** 댓글 저장 */
    commentSave : function () {
        const data = {
            postsId: $('#postsId').val(),
            comment: $('#comment').val()
        }

        // 공백 및 빈 문자열 체크
        if (!data.comment || data.comment.trim() === "") {
            alert("공백 또는 입력하지 않은 부분이 있습니다.");
            return false;
        } else {
            $.ajax({
                type: 'POST',
                url: '/api/posts/' + data.postsId + '/comments',
                dataType: 'JSON',
                contentType: 'application/json; charset=utf-8',
                data: JSON.stringify(data)
            }).done(function () {
                alert('댓글이 등록되었습니다.');
                window.location.reload();
            }).fail(function (error) {
                alert(JSON.stringify(error));
            });
        }
    }
};

main.init();
8. 결과 확인
8-1. 테스트용 데이터 저장


8-2. 게시글 댓글 작성(미로그인)

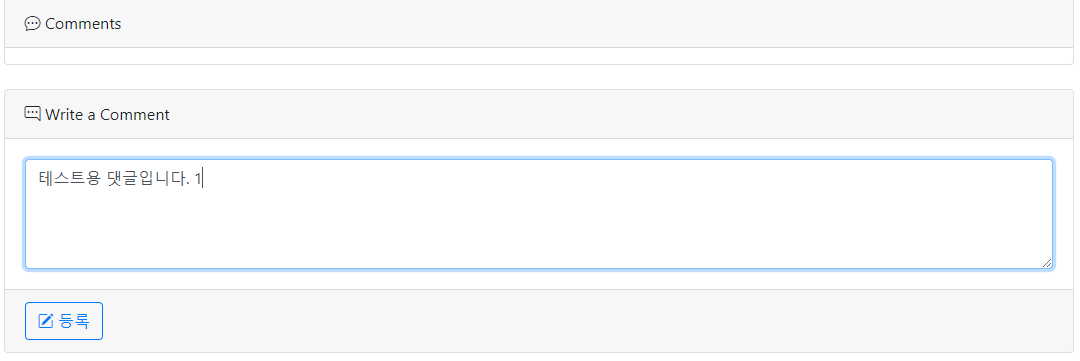
8-3. 게시글 댓글 작성(로그인)

8-4. 댓글 목록 확인


댓글 수정 및 삭제 구현은 다음 포스팅에 이어서 하도록 하자.
'📌ETC > Development Log' 카테고리의 다른 글
| Spring Boot JPA 게시판 댓글 작성자만 수정, 삭제 가능하게 하기 (1) | 2022.01.08 |
|---|---|
| Spring Boot JPA 게시판 댓글 수정 및 삭제 구현하기 (3) | 2022.01.08 |
| Spring Boot 게시판 JPA 연관관계 매핑으로 글 작성자만 수정, 삭제 가능하게 하기 (0) | 2021.12.30 |
| Spring Boot 게시판 OAuth 2.0 네이버 로그인 구현 (1) | 2021.12.28 |
| Spring Boot 게시판 OAuth 2.0 구글 로그인 구현 (15) | 2021.12.28 |
블로그의 정보
슬기로운 개발생활
coco3o