Spring Boot JPA 게시판 검색 기능 & 검색 페이징 구현
by coco3o우리는 만약 게시판에 검색기능이 없다면 찾고자 하는 글을 일일이 찾아야 할것이다.
검색 기능은 꼭 있어야 할 기능이라고 생각해 구현해보려 한다.
우선 검색 기능을 먼저 구현하고, 검색 결과가 많을 경우에 대한 페이징 처리또한 구현하도록 하자.
1. 검색 기능
1-1. Repository
List<Posts> findByTitleContaining(String keyword);JpaRepository에서 메소드명의 By 이후는 SQL의 where 조건 절에 대응되는데,
위와 같이 Containing을 붙여주면 Like 검색이 가능해진다. 즉, %{keyword}%가 가능하다.
자세한 설명은 여기 를 참고하자.
1-2. Service
    /* search */
    @Transactional
    public List<Posts> search(String keyword) {
        List<Posts> postsList = postsRepository.findByTitleContaining(keyword);
        return postsList;
    }
Repository에서 검색결과를 받아 비즈니스 로직을 실행하는 메소드이다.
1-3. Controller
    @GetMapping("/posts/search")
    public String search(String keyword, Model model) {
        List<Posts> searchList = postsService.search(keyword);

        model.addAttribute("searchList", searchList);

        return "posts-search";
    }
1-4. searchForm (Mustache)
    <form action="/posts/search" method="GET" class="form-inline p-2 bd-highlight" role="search">
        <input type="text" name="keyword" class="form-control" id="search" placeholder="검색">
        <button class="btn btn-success bi bi-search"></button>
    </form>
검색창이다. input에 데이터를 입력하면 폼 데이터를 해당 주소로 GET 해준다.
Controller가 데이터를 받아 지지고 볶은 다음 posts-search에 보낸다.
1-5. posts-search.Mustache
{{>layout/header}}
<div id="posts_list">
    <table id="table" class="table table-horizontal">
        <thead id="thead">
        <tr>
            <th>번호</th>
            <th>제목</th>
            <th>작성자</th>
            <th>등록일</th>
            <th>조회수</th>
        </tr>
        </thead>
        <tbody id="tbody">
        {{#searchList}}
            <tr>
                <td>{{id}}</td>
                <td><a href="/posts/read/{{id}}">{{title}}</a></td>
                <td>{{writer}}</td>
                <td>{{modifiedDate}}</td>
                <td>{{view}}</td>
            </tr>
        {{/searchList}}
        </tbody>
    </table>
    <div class="text-right">
        <a href="/posts/write" role="button" class="btn btn-primary bi bi-pencil-fill"> 글쓰기</a>
    </div>
</div>
{{>layout/footer}}
데이터를 받아 검색 결과를 보여준다.
1-7 검색 테스트 하기

'4'를 검색했을 때 제목에 4가 포함된 글들을 가져오는 걸 확인할 수 있다.

2. 검색 후 페이징 처리
검색처리는 구현했지만 아직 부족한 부분이 많이 있다. 이번 파트에서 전체적으로 완성도를 높여보자.
2-1. Repository
Page<Posts> findByTitleContaining(String keyword, Pageable pageable);기존 메소드에서 List 타입을 Page 타입으로, 그리고 파라미터에 Pageable을 받도록 했다.
2-2. Service
    /* search */
    @Transactional
    public Page<Posts> search(String keyword, Pageable pageable) {
        Page<Posts> postsList = postsRepository.findByTitleContaining(keyword, pageable);
        return postsList;
    }
Service 도 동일하게 타입을 Page로, 그리고 파라미터에 Pageable만 추가해주면 끝이다.
2-3. Controller
    @GetMapping("/posts/search")
    public String search(String keyword, Model model, @PageableDefault(sort = "id", direction = Sort.Direction.DESC)
           Pageable pageable) {
        Page<Posts> searchList = postsService.search(keyword, pageable);

        model.addAttribute("searchList", searchList);

        return "posts-search";
    }
@PageableDefault 설정과 Pageable 파라미터를 추가해준다.
2-4. 검색 페이징 테스트

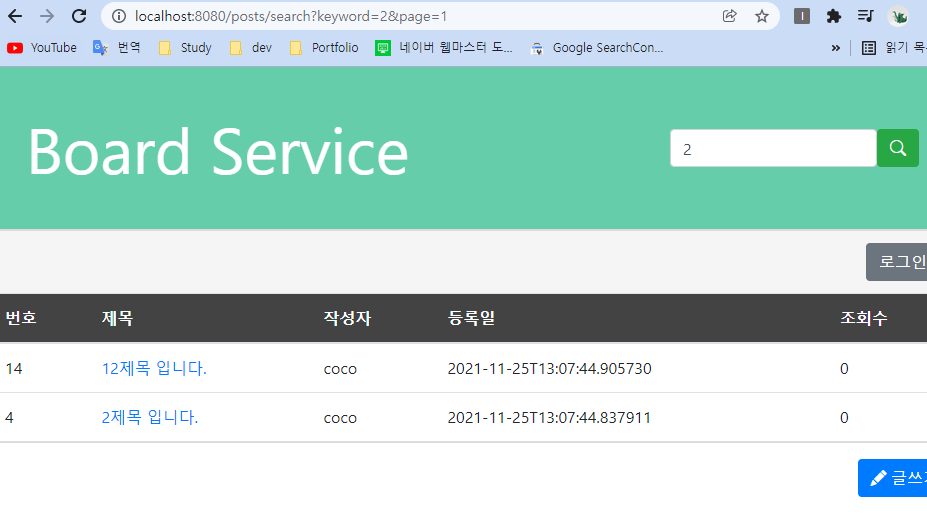
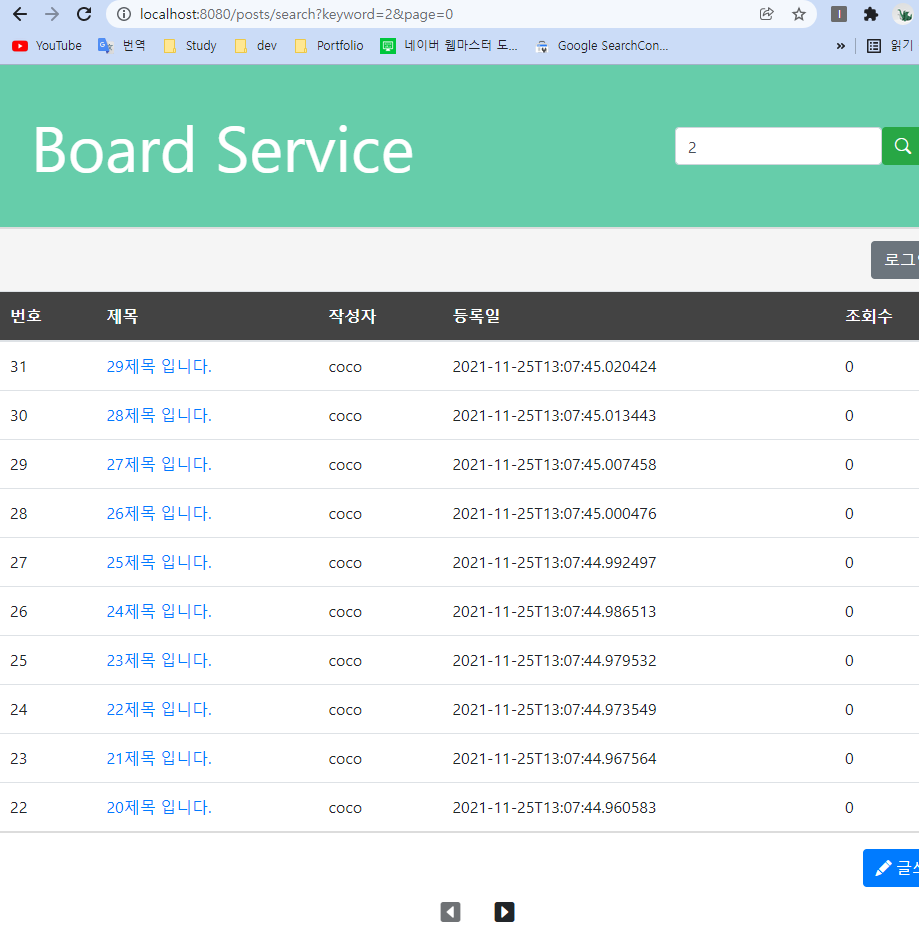
'2' 를 검색했더니 페이지 사이즈가 10으로, 그리고 DESC 정렬되어있는 것을 확인할 수 있다.
그럼 나머지 검색 결과는 어디로 갔지?

url에서 page=1로 검색하면 나머지 검색 결과들이 나온다.
이런 검색 결과를 일일이 url에서 증감 해줄 수 없기에 기존에 썼던 Pagination 버튼을 넣고 수정해보자.
2-5. Controller
        ...
        Page<Posts> searchList = postsService.search(keyword, pageable);

        model.addAttribute("searchList", searchList);
        model.addAttribute("keyword", keyword);
        model.addAttribute("previous", pageable.previousOrFirst().getPageNumber());
        model.addAttribute("next", pageable.next().getPageNumber());
        model.addAttribute("hasNext", searchList.hasNext());
        model.addAttribute("hasPrev", searchList.hasPrevious());

        return "posts-search";
    }
페이징 처리 구현 게시글에서 만들었던 index 메소드안의 페이징 구현부분을 가져와 조금 수정했다.
이전/다음 버튼을 눌러 검색결과 페이지를 볼 때 keyword도 같이 넘어가야 되기 때문에 "keyword"를 추가했고,
검색 내용의 이전/다음 페이지 유무 확인을 위해 searchList에 hasNext()와 hasPrevious() 를추가했다.
2-6. posts-search.Mustache
    {{! Page }}
    <div class="pagination justify-content-center">
        {{#hasPrev}}
            <a href="/posts/search?keyword={{keyword}}&page={{previous}}" role="button" class="btn btn-lg bi bi-caret-left-square-fill"></a>
        {{/hasPrev}}
        {{^hasPrev}}
            <a href="/posts/search?keyword={{keyword}}&page={{previous}}" role="button" class="btn btn-lg bi bi-caret-left-square-fill disabled"></a>
        {{/hasPrev}}

        {{#hasNext}}
            <a href="/posts/search?keyword={{keyword}}&page={{next}}" role="button" class="btn btn-lg bi bi-caret-right-square-fill"></a>
        {{/hasNext}}
        {{^hasNext}}
            <a href="/posts/search?keyword={{keyword}}&page={{next}}" role="button" class="btn btn-lg bi bi-caret-right-square-fill disabled"></a>
        {{/hasNext}}
    </div>
a href 부분만 수정했다.
2-7. 최종 결과 확인


검색과 페이징처리까지 모두 완성 했다.
'📌ETC > Development Log' 카테고리의 다른 글
| Spring Boot JPA 게시판 Security 회원가입,로그인 구현 (5) | 2021.12.13 |
|---|---|
| Spring Boot JPA 게시판 LocalDateTime format 변경하기 (0) | 2021.12.02 |
| Spring Boot JPA 게시판 페이징 처리 구현 (0) | 2021.11.23 |
| Spring Boot JPA 게시판 조회수 기능 추가 (7) | 2021.11.20 |
| 신입 백엔드 포트폴리오 만들기 - 프로젝트 명세서 (31) | 2021.11.10 |
블로그의 정보
슬기로운 개발생활
coco3o