Spring Boot 게시판 Security 회원정보 수정(ajax) 구현
by coco3o오늘은 Security에서 회원정보를 수정하는 기능을 구현해보자.
1. User, TimeEntity
User
@AllArgsConstructor
@NoArgsConstructor
@Builder
@Getter
@Entity
public class User extends TimeEntity {

    @Id
    @GeneratedValue(strategy = GenerationType.IDENTITY)
    private Long id;

    @Column(nullable = false, length = 30, unique = true)
    private String username; // 아이디

    @Column(nullable = false, unique = true)
    private String nickname;

    @Column(nullable = false, length = 100)
    private String password;

    @Column(nullable = false, length = 50)
    private String email;

    @Enumerated(EnumType.STRING)
    @Column(nullable = false)
    private Role role;

    /* nickname과 password만 수정 가능 */
    public void modify(String nickname, String password) {
        this.nickname = nickname;
        this.password = password;
    }
}
TimeEntity
@Getter
@MappedSuperclass
@EntityListeners(AuditingEntityListener.class)
public abstract class TimeEntity {

    @Column(name = "created_date")
    @CreatedDate
    private String createdDate;

    @Column(name = "modified_date")
    @LastModifiedDate
    private String modifiedDate;

    /* 해당 엔티티를 저장하기 이전에 실행 */
    @PrePersist
    public void onPrePersist(){
        this.createdDate = LocalDateTime.now().format(DateTimeFormatter.ofPattern("yyyy.MM.dd"));
        this.modifiedDate = this.createdDate;
    }

    /* 해당 엔티티를 업데이트 하기 이전에 실행*/
    @PreUpdate
    public void onPreUpdate(){
        this.modifiedDate = LocalDateTime.now().format(DateTimeFormatter.ofPattern("yyyy.MM.dd HH:mm"));
    }
}
2. DTO
UserSessionDto
@Getter
public class UserSessionDto implements Serializable {

    private Long id;
    private String username;
    private String nickname;
    private String email;
    private Role role;
    private String modifiedDate;

    /* Entity -> dto */
    public UserSessionDto(User user) {
        this.id = user.getId();
        this.username = user.getUsername();
        this.nickname = user.getNickname();
        this.email = user.getEmail();
        this.role = user.getRole();
        this.modifiedDate = user.getModifiedDate();
    }
}
회원정보 수정 시 수정 날짜를 업데이트해주기 위해 modifiedDate 추가
UserRequestDto
@Data
@AllArgsConstructor
@NoArgsConstructor
@Builder
public class UserRequestDto {

        private Long id;

        @Pattern(regexp = "^[ㄱ-ㅎ가-힣a-z0-9-_]{4,20}$", message = "아이디는 특수문자를 제외한 4~20자리여야 합니다.")
        @NotBlank(message = "아이디는 필수 입력 값입니다.")
        private String username;

        @Pattern(regexp = "(?=.*[0-9])(?=.*[a-zA-Z])(?=.*\\W)(?=\\S+$).{8,16}", message = "비밀번호는 8~16자 영문 대 소문자, 숫자, 특수문자를 사용하세요.")
        private String password;

        @Pattern(regexp = "^[ㄱ-ㅎ가-힣a-z0-9-_]{2,10}$", message = "닉네임은 특수문자를 제외한 2~10자리여야 합니다.")
        @NotBlank(message = "닉네임은 필수 입력 값입니다.")
        private String nickname;

        @Pattern(regexp = "^(?:\\w+\\.?)*\\w+@(?:\\w+\\.)+\\w+$", message = "이메일 형식이 올바르지 않습니다.")
        @NotBlank(message = "이메일은 필수 입력 값입니다.")
        private String email;
    ...
}
3. Service
    /* 회원수정 (dirty checking) */
    @Transactional
    public void modify(UserRequestDto dto) {
        User user = userRepository.findById(dto.toEntity().getId()).orElseThrow(() ->
                new IllegalArgumentException("해당 회원이 존재하지 않습니다."));

        String encPassword = encoder.encode(dto.getPassword());
        user.modify(dto.getNickname(), encPassword);
    }
user 객체에 데이터를 가져와 영속화 시키고, 데이터를 변경하여 자동으로 저장하게 만들었다.
위 코드를 잘 보면 save()가 없는데도 저장이 된다. 이게 가능한 이유는 JPA의 영속성 컨텍스트 때문이다.
※영속성 컨텍스트? 엔티티를 영구 저장하는 환경이다. 어플리케이션과 데이터베이스 사이에서 객체를 보관하는 가상의 데이터베이스 같은 역할을 한다.
트랜잭션 안에서 데이터베이스의 데이터를 가져오면 이 데이터는 영속성 컨텍스트가 유지된 상태가 된다.
이 상태에서 해당 데이터의 값을 변경하면 트랜잭션이 끝나는 시점에 변경된 데이터를 데이터베이스에 반영해준다.
이러한 개념을 변경 감지(더티 체킹)이라고 한다.
4. Controller
4-1. 화면 연결 Controller
@RequiredArgsConstructor
@Controller
public class UserController {

    ...

    /* 회원정보 수정 */
    @GetMapping("/modify")
    public String modify(@LoginUser UserSessionDto userDto, Model model) {
        if (userDto != null) {
            model.addAttribute("user", userDto.getNickname());
            model.addAttribute("userDto", userDto);
        }
        return "/user/user-modify";
    }
}
수정할 회원 정보를 받아 model에 담아줬다.
4-2. RestController
@RequiredArgsConstructor
@RequestMapping("/api")
@RestController
public class UserApiController {

    private final UserService userService;

    @PutMapping("/user")
    public ResponseEntity<String> modify(@RequestBody UserRequestDto dto) {
        userService.modify(dto);

        return new ResponseEntity<>("success", HttpStatus.OK);
    }
}
이렇게 하고 정보 수정을 완료하면 DB에는 데이터 변경이 적용되지만, 재로그인을 하지 않는 이상 사용자 화면에선 변경되지 않는다.
이유는 수정되기 전의 세션을 갖고 있기 때문이다.
그래서 다음과 같이 변경했다.
public class UserApiController {

    private final UserService userService;

    private final AuthenticationManager authenticationManager;

    @PutMapping("/user")
    public ResponseEntity<String> modify(@RequestBody UserRequestDto dto) {
        userService.modify(dto);

        /* 변경된 세션 등록 */
        Authentication authentication = authenticationManager.authenticate(
                new UsernamePasswordAuthenticationToken(dto.getUsername(), dto.getPassword()));

        SecurityContextHolder.getContext().setAuthentication(authentication);

        return new ResponseEntity<>("success", HttpStatus.OK);
    }
}
변경된 세션을 바로 등록하기 위해 새로운 UsernamePasswordAuthenticationToken을 만들어주고,
AuthenticationManager를 사용해 등록해준다.
SecurityContextHolder 안에 있는 Context를 불러와 변경된 Authentication을 설정해준다.
여기서 AuthenticationManager를 사용하기 위해서는 다음과 같이 Bean으로 등록해줘야 한다.
5. SecurityConfig
@RequiredArgsConstructor
@Configuration
@EnableWebSecurity
@EnableGlobalMethodSecurity(prePostEnabled = true)
public class SecurityConfig extends WebSecurityConfigurerAdapter {

    private final CustomUserDetailsService customUserDetailsService;

    private final AuthenticationFailureHandler customFailureHandler;

    @Bean
    public BCryptPasswordEncoder Encoder() {
        return new BCryptPasswordEncoder();
    }

    /* AuthenticationManager Bean 등록 */
    @Bean
    @Override
    public AuthenticationManager authenticationManagerBean() throws Exception {
     return super.authenticationManagerBean();
    }

    /* 시큐리티가 로그인 과정에서 password를 가로챌때 어떤 해쉬로 암호화 했는지 확인 */
    @Override
    protected void configure(AuthenticationManagerBuilder auth) throws Exception {
        auth.userDetailsService(customUserDetailsService).passwordEncoder(Encoder());
    }

    /* static 관련설정은 무시 */
    @Override
    public void configure(WebSecurity web) throws Exception {
        web
                .ignoring().antMatchers( "/css/**", "/js/**", "/img/**");
    }

    @Override
    protected void configure(HttpSecurity http) throws Exception {
        http
                .csrf().ignoringAntMatchers("/api/**") /* REST API 사용 예외처리 */
                .and()
                .authorizeRequests()
                .antMatchers("/", "/auth/**", "/posts/read/**", "/posts/search/**").permitAll()
                .anyRequest().authenticated()
                .and()
                .formLogin()
                .loginPage("/auth/login")
                .loginProcessingUrl("/auth/loginProc")
                .failureHandler(customFailureHandler)
                .defaultSuccessUrl("/")
                .and()
                .logout()
                .invalidateHttpSession(true).deleteCookies("JSESSIONID");
    }
}
6. user-modify.mustache
{{>layout/header}}
<div id="posts_list">
    <div class="container col-md-4">
        <form>
            <label for="id"></label>
            <input type="hidden" id="id" value="{{userDto.id}}"/>
            <input type="hidden" id="id" value="{{userDto.modifiedDate}}"/>
            <div class="form-group">
                <label for="username">아이디</label>
                <input type="text" id="username" value="{{userDto.username}}" class="form-control" readonly/>
            </div>

            <div class="form-group">
                <label for="password">비밀번호</label>
                <input type="password" id="password" class="form-control" placeholder="수정할 비밀번호를 입력해주세요"/>
            </div>

            <div class="form-group">
                <label for="nickname">닉네임</label>
                <input type="text" id="nickname" value="{{userDto.nickname}}" class="form-control" placeholder="수정할 닉네임을 입력해주세요"/>
            </div>

            <div class="form-group">
                <label for="email">이메일</label>
                <input type="email" id="email" value="{{userDto.email}}" class="form-control" readonly/>
            </div>
        </form>
        <button id="btn-modify" class="btn btn-primary bi bi-check-lg"> 완료</button>
        <a href="/" role="button" class="btn btn-info bi bi-arrow-return-left"> 목록</a>
    </div>
</div>
{{>layout/footer}}
7. app.js
const main = {
    init : function() {
        const _this = this;
        ...
        $('#btn-modify').on('click', function () {
            _this.modify();
        });
    },

    ...
    modify : function () {
        const data = {
            id: $('#id').val(),
            modifiedDate: $('#modifiedDate').val(),
            username: $('#username').val(),
            nickname: $('#nickname').val(),
            password: $('#password').val()
        }
        if(!data.nickname || data.nickname.trim() === "" || !data.password || data.password.trim() === "") {
            alert("공백 또는 입력하지 않은 부분이 있습니다.");
            return false;
        } else if(!/(?=.*[0-9])(?=.*[a-zA-Z])(?=.*\W)(?=\S+$).{8,16}/.test(data.password)) {
            alert("비밀번호는 8~16자 영문 대 소문자, 숫자, 특수문자를 사용하세요.");
            $('#password').focus();
            return false;
        } else if(!/^[ㄱ-ㅎ가-힣a-z0-9-_]{2,10}$/.test(data.nickname)) {
            alert("닉네임은 특수문자를 제외한 2~10자리여야 합니다.");
            $('#username').focus();
            return false;
        }
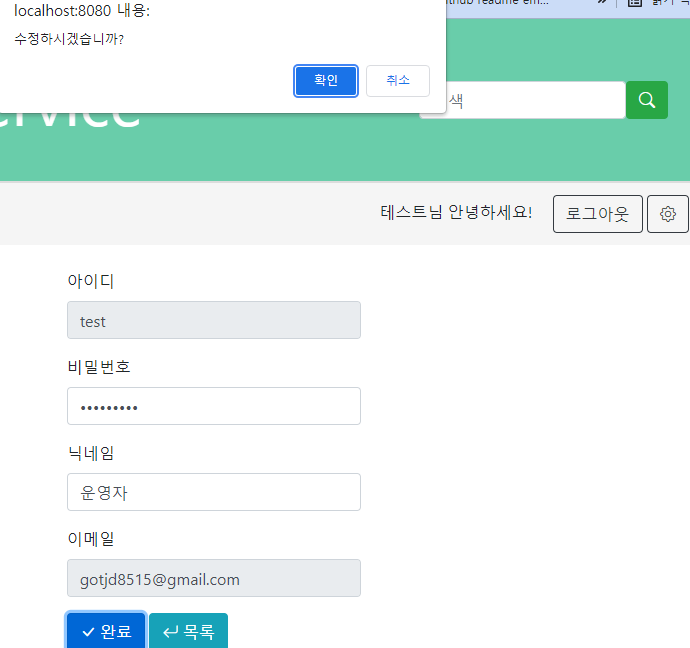
        const con_check = confirm("수정하시겠습니까?");
        if (con_check === true) {
            $.ajax({
                type: "PUT",
                url: "/api/user",
                contentType: 'application/json; charset=utf-8',
                data: JSON.stringify(data)

            }).done(function () {
                alert("회원수정이 완료되었습니다.");
                window.location.href = "/";

            }).fail(function (error) {
                if (error.status === 500) {
                    alert("이미 사용중인 닉네임 입니다.");
                    $('#nickname').focus();
                } else {
                    alert(JSON.stringify(error));
                }
            });
        }
    }
};

main.init();
닉네임과 비밀번호만 변경하지만, data에 id(pk), modifiedDate, username을 같이 받는 것을 볼 수 있다.
id는 Service에서 해당 회원정보를 가져오기 위해, modifiedDate는 수정 날짜를 업데이트해주기 위해 받았고,
username은 UsernamePasswordAuthenticationToken()에 username을 넣어주기 위해 받았다.(안 넣으면 null)
8. 결과 확인
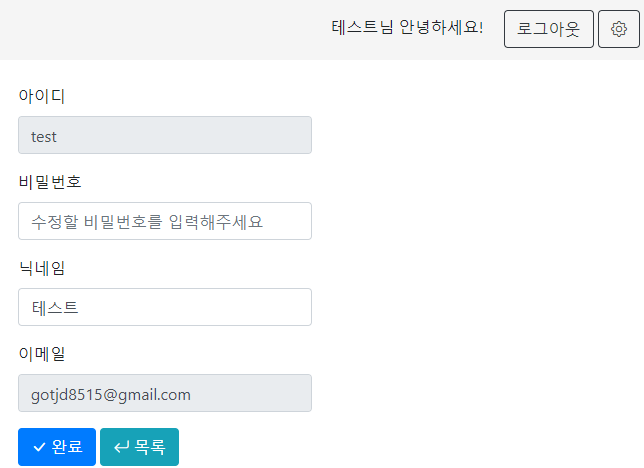
1. Test 계정 생성 후 정보 수정 화면 이동

2. 정보 수정


3. 정보 수정 후 Before / After 비교


'📌ETC > Development Log' 카테고리의 다른 글
| Spring Boot 게시판 OAuth 2.0 네이버 로그인 구현 (1) | 2021.12.28 |
|---|---|
| Spring Boot 게시판 OAuth 2.0 구글 로그인 구현 (15) | 2021.12.28 |
| Spring Boot 게시판 Security 로그인 실패시 메시지 출력하기 (2) | 2021.12.21 |
| Spring Boot 게시판 Validation을 커스텀하여 회원가입 중복검사 구현 (9) | 2021.12.20 |
| Spring Boot 회원가입 Validation 유효성 검사하기 (3) | 2021.12.18 |
블로그의 정보
슬기로운 개발생활
coco3o